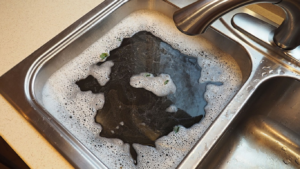
A clogged shower head can significantly reduce water pressure, making showers less effective and frustrating. Over time, mineral deposits, mold, and bacteria can accumulate, blocking the nozzles and restricting water flow. Regular cleaning ensures your shower head functions efficiently and extends its lifespan. Follow these shower head cleaning tips.
This guide provides detailed shower head cleaning tips, including step-by-step methods to remove buildup and maintain a steady water flow.
Why Cleaning Your Shower Head is Important
Shower heads accumulate hard water deposits, bacteria, and mold, which can:
- Reduce water pressure and flow
- Cause uneven water distribution
- Promote bacterial growth, such as Legionella
- Shorten the lifespan of the shower head
Regular cleaning restores performance, prevents health hazards, and helps avoid costly replacements.
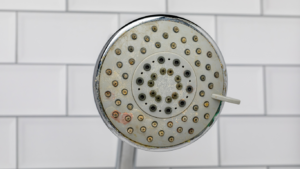
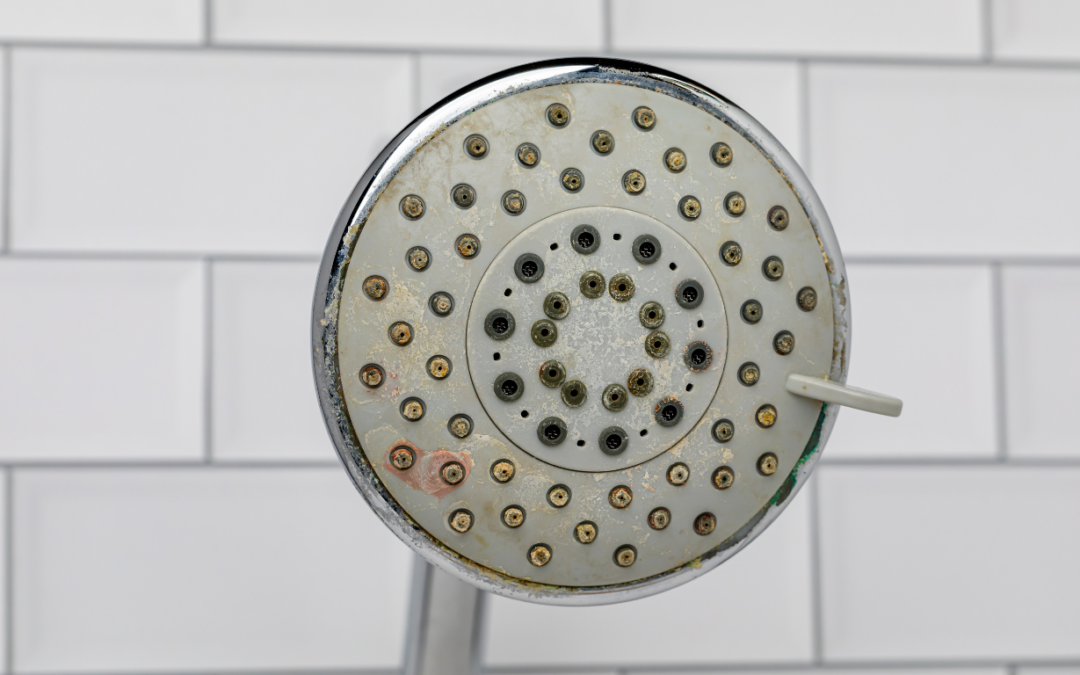
Signs Your Shower Head Needs Cleaning
If your shower head is not performing as expected, look for these signs:
- Low water pressure or weak water flow
- Water spraying in different directions
- White or green deposits on the nozzles
- Mold or a musty odor around the shower head
If any of these issues are present, it is time to clean the shower head thoroughly.
Effective Shower Head Cleaning Tips
There are several ways to clean a shower head, depending on the level of buildup. Below are the most effective methods to restore water flow and remove mineral deposits.
1. Vinegar Soak for Deep Cleaning
Best for: Hard water deposits and mineral buildup
What You Need:
- White vinegar
- Plastic bag
- Rubber band or twist tie
- Soft brush or toothbrush
Steps:
- Fill a plastic bag with enough white vinegar to fully submerge the shower head nozzles.
- Attach the bag to the shower head and secure it with a rubber band or twist tie.
- Let it soak for at least one to two hours. For heavy buildup, leave it overnight.
- Remove the bag and scrub the nozzles using a toothbrush or soft brush.
- Run hot water through the shower head to flush out any remaining residue.
For detachable shower heads, soak them in a bowl of vinegar for better results.
2. Baking Soda Paste for Stubborn Stains
Best for: Stubborn grime and discoloration
What You Need:
- Baking soda
- Water
- Toothbrush
Steps:
- Mix baking soda with water to create a thick paste.
- Apply the paste to the shower head, focusing on the nozzles.
- Let it sit for 15 minutes.
- Scrub with a toothbrush to remove buildup.
- Rinse thoroughly with warm water.
This method is effective for breaking down mineral deposits and polishing the surface of the shower head.
3. Lemon Juice for a Natural Clean
Best for: Light buildup and maintaining cleanliness
What You Need:
- Fresh lemons
- Soft cloth
Steps:
- Cut a lemon in half and rub it directly onto the shower head.
- Squeeze lemon juice into a bowl and soak a cloth in it.
- Wrap the cloth around the shower head and let it sit for 30 minutes.
- Rinse with warm water to remove any residue.
Lemon juice naturally dissolves mineral deposits while leaving a fresh scent.
4. Clearing Clogged Nozzles with a Toothpick or Needle
Best for: Manually removing buildup from clogged nozzles
What You Need:
- Toothpick or needle
- Soft cloth
- Warm water
Steps:
- Use a toothpick or small needle to gently poke through the clogged nozzles.
- Run hot water through the shower head to flush out loosened debris.
- Wipe the surface clean with a soft cloth.
This method is most effective when used after soaking the shower head in vinegar.
How Often Should You Clean Your Shower Head?
To maintain water flow and prevent buildup, follow this cleaning schedule:
- Light cleaning: Wipe down the shower head once a month with vinegar or lemon juice.
- Deep cleaning: Soak in vinegar every three to six months.
- Hard water areas: Clean every one to two months to prevent mineral accumulation.
Regular maintenance helps prevent major clogs and ensures consistent water pressure.
Preventing Future Buildup
To keep your shower head clean and reduce mineral deposits, follow these preventive measures:
- Install a water softener to reduce hard water minerals.
- Wipe down the shower head after each use to prevent buildup.
- Use a filtered shower head to minimize chlorine and mineral deposits.
- Run hot water weekly to flush out debris and bacteria.
These small adjustments can extend the life of your shower head and reduce the need for deep cleaning.
When to Replace Your Shower Head
Even with regular maintenance, shower heads eventually wear out. Consider replacing your shower head if:
- Water pressure remains low despite multiple cleanings
- Mold or bacteria keep recurring
- Cracks or leaks are visible
Most shower heads last six to eight years, but those in areas with hard water may require more frequent replacement.
Final Thoughts…
Cleaning your shower head regularly is essential for maintaining water flow and preventing mineral buildup. By using vinegar soaks, baking soda scrubs, and other simple cleaning techniques, you can keep your shower head in top condition. Regular maintenance will help you enjoy a strong and steady water flow while extending the lifespan of your fixture.
For best results, incorporate these shower head cleaning tips into your routine to prevent clogs and maintain a high-performing shower experience.
– RMG Plumbing